跳到主要内容

3 篇博文 含有标签「docker」

查看所有标签

Shrink Disk in Google Cloud Platform on Ubuntu With The Smallest Effort Possible

· 阅读需 3 分钟
Kobkrit Viriyayudhakorn
CEO, iApp Technology

Like everyone else, when you creating a disk for an instance, we usually allocate the size of disk much much higher than we actually need. We have a very pessimistic view on a disk space we need, and finally, we end up wasting money on unnecessary matters.

I created an instance on GCP, aimed for running several docker containers. I create an extra 500GB drive located in /dev/sdb (to be mounted on /var/lib/docker) attached to my instance, but actually, an only 60GB drive is needed. The following steps are for shrinking a disk for the unmountable partition.

  1. Make the snapshot of a disk for backup in GCP (Actually docker-1-var-lib-docker is originally 500GB)
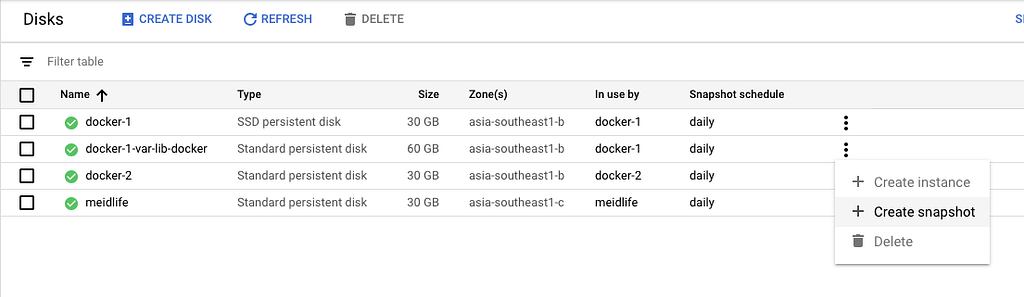
2. Down your docker in Ubuntu, $ sudo service docker stop

3. Umount the old disk, $ sudo umount /dev/sdb

4. Resize it, $ sudo resize2fs /dev/sdb 60G You need to wait a while.

5. Edit its partition table, $ sudo cfdisk /dev/sdb will give you a text-based gui to inspect your partition table. I would recommend you to print the partition table to a file or screen at that point, and take note of the current configuration as backup. You can then select /dev/sdb and delete the partition. In its place, free space will be displayed. Use new to create a new partition with 60 GB in its place, and set the type to ext4. Then, move to the trailing free space and create the 440GB swap partition with type swap.

6. Create a new disk in GCP with the size of 60GB attached with the instance. It will be on /dev/sdc, you can view it by $ lsblk (The image is taken after the process is done.)
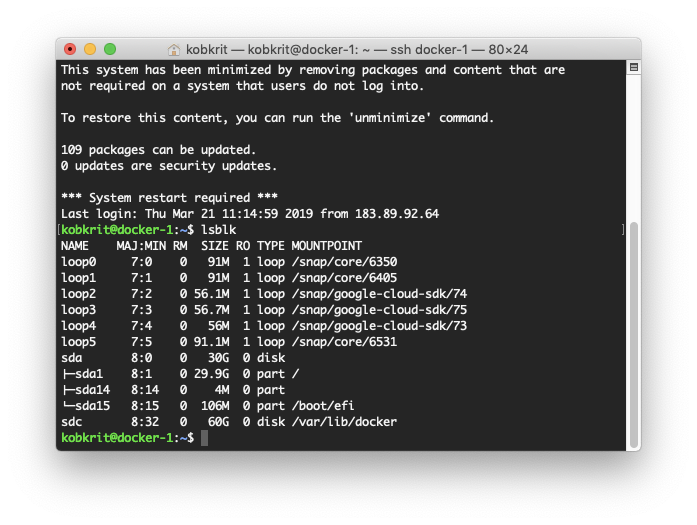
7. Finally clone the disk, dd if=/dev/sdb of=/dev/sdc (It will take a while)

8. Try to mount /dev/sdc on /var/lib/docker instead of the old disk mount /dev/sdc /var/lib/docker

9. Start the docker service $ sudo service docker start

10. Hooray!, Now everything works with the smaller disk need.
11. Get rid of the old disk on GCP. We do not need to pay from them anymore.

In summary, we unmount a disk, shrink the disk, edit the partition table, and then using dd to clone disk from the old to the new. Finally, mount the new on the old’s mount point and finally, we can get rid of the old disk.

Hope this guide saves your time.

Thank you.

For those whoever want to develop and get consult on creating your own AI model, please getting more information at our company website “iApp Technology” (https://iapp.co.th) and testing our AI demoes (https://ai.iapp.co.th). You can contact me directly at kobkrit@iapp.co.th. Thank you very much. #iApp #Ai

See more at https://iapp.co.th and https://ai.iapp.co.th


Shrink Disk in Google Cloud Platform on Ubuntu With The Smallest Effort Possible was originally published in Kobkrit on Medium, where people are continuing the conversation by highlighting and responding to this story.

Trick: How to significantly reduce NPM download time for NodeJS Web application on Docker image

· 阅读需 2 分钟
Kobkrit Viriyayudhakorn
CEO, iApp Technology

2

Docker made my life much easier! I put every web application project to its own docker container. Docker allows me to deploy web application server on any cloud or any service providers. We can customize the dependencies to any versions of libraries that we want to use, and also integrated well with any continuous integration tools (like Jenkins).

Docker is excellent, but, the biggest drawback of Docker compared to the traditional FTP upload to server, it requires significant amount of time to complies a docker image. Generally for moderate size of web application project, it takes about 6–8 minutes to produce an image.

Turn out, I found the way to optimize the time to produce an image, especially for NodeJS Web application. Most of docker image compile time is wasted due to NPM install. It contributes 95% of the time. With simple Dockerfile modification, I can reduce from 6 minute to 10 seconds for building an image if the dependencies is not changed.

Instead of writing Dockerfile in the popular format like this.

FROM node:9  
MAINTAINER Kobkrit Viriyayudhakorn (kobkrit@iapp.co.th)RUN mkdir -p /usr/src/app
WORKDIR /usr/src/app
COPY . /usr/src/app/
RUN npm installCMD [ "npm", "start" ]EXPOSE 4000

Change to this.

FROM node:9MAINTAINER Kobkrit Viriyayudhakorn (kobkrit@iapp.co.th)ADD package.json /tmp/package.json  
RUN cd /tmp && npm install
RUN mkdir -p /usr/src/app && cp -a /tmp/node_modules /usr/src/app/WORKDIR /usr/src/app
COPY . /usr/src/app/CMD [ "npm", "start" ]EXPOSE 4000

The key ideas is to change from running npm install every time when your web changes to running only when its dependencies changed. We caches the whole node_modules folder, and save it to a docker commit. If your dependencies are not changed, docker can reuse the old commit for building the new one, significantly saving your docker image building time!

The following are improvement in a real work.

I change to the new Dockerfile on build #6. I changed dependencies on build #8, and #11.

In build #1-#5, I used the first Dockerfile. I changed to the latter on build #6. In build #7, it has no dependencies changed, but in build #8, it has some dependencies change which need to re-run npm install.

How to handle all Keyboard problems in React-Native with only 5 lines of code

· 阅读需 1 分钟
Kobkrit Viriyayudhakorn
CEO, iApp Technology

Easiest way to shift up the screen when keyboard is shown up and hide it when touch other parts.

6

Can not type password here T_T

Shift up the screen when the keyboard is shown up.

  1. Use the KeyboardSpacer, $ npm install react-native-keyboard-spacer
  2. Adding the followings into your React component,
**import KeyboardSpacer from 'react-native-keyboard-spacer';** class LoginScreen extends React.Component {  
...render() {  
...
return (
<View style={Styles.container}>
<View style={Styles.yourOldContainerView}>
</View>
**< KeyboardSpacer />**
</View>
);
}

Done.

Dismiss the keyboard when user touch somewhere else.

  1. Use DismissKeyboard, Do not need to install anything. It comes with React-Native.
**import DismissKeyboard from 'dismissKeyboard';** class LoginScreen extends React.Component {  
...render() {  
...
return (
**< TouchableWithoutFeedback onPress={()=>{DismissKeyboard()}}>** <View style={Styles.container}>
<View style={Styles.yourOldContainerView}>
</View>
<KeyboardSpacer />
</View>** </TouchableWithoutFeedback>**
);
}

Done.

Easy right?